Saturday, May 26, 2018

The One Where I Hang Tough with all The Right Stuff!

Oh Joey! How did I love thee? Let me count the ways... It was like a million different and rather freakish ways people! At 12 I didn't want to be Donnie's "Cover Girl" or have Jordan love me forever! Nope, all I wanted was for Joey to sing "Please don't go girl" directly to me, while finding me so irresistible that he has the insatiable need to drag me up onto stage and kiss me in front of all the screaming fans! Of course then he would promptly ask me to marry him and have beautiful babies all named Joey Jr. I really thought this was my future ya'll! Some secret part of my soul believed this was all possible! I did not land me a New Kid but I did get my own little Joey (Christopher really)  who texts me at least once a month, "How you doin?" most of the time followed up with something a little more uncensored. My Joey adores me though and is certainly the best consultation prize I could have asked for. 

That's me on the bed with a stapler and a new clipping for that fantastic wall! 

The New Kids on the Block were my first boy crushes and to this day make me flutter just a little. Let's face it Joey has aged well and can still sing. The over forty Danny Wood can even make a woman swoon with the curl of his bicep! The man is buff and "Hanging Tough" all the way round with those abs and tight tooshie! Look him up if you haven't seen him in a while. 

Anyway you get the point, these guys were major heart throbs for me and a huge part of my childhood memories. Even some of my best adult memories include the NKOTB since I didn't see them in concert till my twenties. (Ruthann you already know! Donnie and you are bonded for life because of my Sharpie work. LMBO)   

I am about 25 here finally seeing NKOTB for the first time! See that Joey poster! 
20$ outdoor show by the way, in a super small venue! It was like front row most of the time! Lots of rather scantily dressed women screaming and men on stage tearing shirts off! Best show I have seen other than Prince. LOL 
But I am getting too excited talking about my New Kids so let's get to the crafts! 

Quick tip: *Set Pandora to NKOTB radio station it's awesome! It's a blend of 80s and 90s pop.

I have a huge craft room that has TONS of let's just say "character". My home was built in 1984 and still has some very original pieces retro "art". It sounds nicer that way doesn't it. I moved into a mustard and maroon kitchen and even had ceramic duck hangers upstairs! I could go on but that may be for another blog post probably titled The one where Joey wears tight pants by Sergio Valente.  

But I digress, here is my retro "art" piece that I will be restoring to some sense of glory today. Isn't she lovely? 


When I took over the 🎝🎝♫♫outdoor space as a craft room I decided to have some fun with these so called "art" pieces instead of replacing them. Plus let's face it I am a stay at home broke mom! As always my ideas pretty much stem from Pintrest. Someone on there had put flowers and all this pretty stuff on an old fan for a craft room. I knew I had to take it up a notch because the girly shabby chic look is just not my thing. This is what came to my brain! 

Here is your "Step by Step" guide to your very own NKOTB FAN! 

Supplies: 
A Fan 
Sandpaper or an electric sander 
Paint 
Mod Podge 
Scissors
Computer  
Old Pics 

Tune your music to the NKOTB "Step by Step" now for maximum enjoyment and results on your project. :) 

Step 1: We can have lots of fun! 
I found all my NKOTB pictures on Ebay. Did you know you can by pieces of old Teen Beat and Bop magazine for a reasonable rate. I paid about 8 dollars for 15 pages of NKOTB stuff! Not a bad deal. If you are into 1980's Muscle Magazines with Silvestor Stalone you can get those too! You are welcome. 

Step 2: There is so much we can do! 
Take the fan blades down and clean them well. You guys know they are dirty! At this step there is literally so much you can do! LOL  You can hand sand them or use an electric sander. Just buff off the shine so the paint sticks well. I did this by hand and it was way too much work. Use the electric! You can also leave them wood colored if you want. These would look super cool spray painted neon colors, but I didn't want to go to the store since both Sam and Frodo are home for the summer so I used what I had in my stash of paints. 
Sam and Frodo AKA Owen 

You also have the options to just cover the whole thing with your pictures. You need more than 15 8x10 sheets by the way if you choose to do that. I did not have enough. 


Step 3: It's just you and me. 
Well Joey it's just you and me...
At this step, cut out all the pics to fit the spaces and begin to place them on the boards. I trimmed all mine larger than I wanted and then down from there, even leaving some overhanging the sides with the plan of cutting them down later. My goal was to make it look like a 12 year old fan did this. LOL Don't be exact just have fun! 


Step 4: I can give you more! 
Now that you have the placement figured out and everything is right start gluing your pieces. Follow the directions on your Mod Podge bottle for this. 

Tip: Get something similar to a credit card to smooth things before you start!!! Bubbles will form!

Step 5: Don't you know that the time is right!!! 
You will know that the time is right for cutting off excess when the pictures are totally dry. I would say 2-3 hours at least. Once it is dry you can use scissors or an exacto knife to cut off the excess. You could also glue these around the blades if you don't want to cut them. 

Optional last step: You could get super ambitious and actually take the whole fan down and spray it too. It would look awesome. I am not that awesome. 

Hang your new fan blades and enjoy!!! 


Wednesday, April 18, 2018

The one where Gandalf brings me a table top

It all started one day when a friend brought me a tabletop off the side of the rode. He is a fellow trash digger like myself and knows a good treasure when he sees it (Thanks Herb). This great wizard of trash goods knows me all to well and has become a supplier of many of my crafts. So as I stood there looking at this table top, I did what any rational and completely normal person would do... I went to Pintrest! Many things come up for upcycled table tops; but one thing caught my eye! A HOBBIT HOLE! Being the super Middle Earth nerd that I am, (I have even created a location on Facebook calling my house the Shire and made up my own house rules that require all those within to "dream of Middle Earth") you can imagine my excitement at this suggestion!! So of course here I go crafting... "there and back again"...


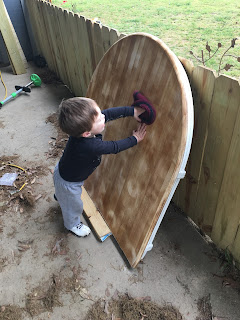
Originally, this table was oblong. I had my handy and might I add super cute husband cut it down to this size. The next step was to sand the table top (Raided super cute hubby's tools). All you need is a sander and your headphones. I suggest Bob Marley's "Three Little Birds". Everything is easy peasy when you are listening to reggae music right? Plus it sound way better than a sander! 


After you have sanded your piece, wipe it down with a dry cloth, then a wet one and let it dry. Kids can help with this part. My 2 year old hobbit is always a good helper. He is always quick to remind me when we have almost skipped second breakfast and elevensies. 


Next comes finding the perfect circle! It just so happens that I have another old table that I use around my fire pit (Another rode side find!) I used a small 2x4 to put it at the correct height then I traced it with a pencil. I used the same 2x4 to then put the brick shapes around the circle. Since My husband has a woodworking hobby I have access to lots of wood. I found a piece a little wider to trace lines of the boards for Bilbo's door. My wee hobbit played with his fishing pole while I did all this, which was super helpful and did not make any of this extremely difficult. 


Now you have your basic hobbit hole outlined. I took mine inside my new craft room because it's super windy today and I didn't want dirty in my paint. The first thing I did was take some black paint and roughly paint the wood of the door so that it was show through my green. I am going to go back later with brown to touch it up. It worked pretty well. So far so good! 


The next step in this process is the most important!!!! Check on your hobbit, especially if they are quiet!!! No large amount of damage done. Ok let's move on. 


While the green is drying you can start on the bricks. Brick color was a little difficult since I didn't have the right red and I was not going to the store with my little golum, opps I mean hobbit. Red and brown mixed up made a decent brick color after some experimentation. I didn't care if it all matched since I wanted it to look like real bricks and they are never the same. I mixed Anita's Acrylic Earth Brown and Dark Red.


Next as Tolkien writes we need, "courage and some wisdom, blended in measure" the painted details are coming! Guys, I AM NOT AN ARTIST!!! I have been made fun of actually for not being able to draw and paint. My handwriting is even atrocious! However, I am getting better! Just dive in and try. I think part of learning to paint is just getting rid of the fear of screwing up. I have one sign that I have painted over like five times!!! All it says is The Shire! lol Everything can be fixed or done over! Well... except the demise of the one ring! It's gone forever! Poor Smeagol. Anyone else feel sorry for him at the end? 

Anyways, here are some tips I have learned along the way with paint. 

1. Use a smaller brush that you think you need. You can always make something larger after you get the basic outline right. 
2. Use less paint. Again you can always add, but it's hard to delete something. 
3. Trace anything you can!! If you can trace it or transfer it, DO IT! Who cares if it's cheating. Maybe one day with practice you won't have to cheat. 
4. Get the right brushes! Don't buy the cheapest and know which ones to use. Google is awesome and youtube has the answer to everything in life yall! 
5. Wait on your hobbit to take a nap before you start the hard stuff. 

The details on this are pretty easy. Elton John and the Beatles will help your stress level if you are like me and freak every single time the paint brush touches the craft you are painting (Pandora Beatles Station has been my jam today). However, as Tolkien says, "Faithless is he that says farewell when the road darkens" so on and on we go we go, brushes in hand, till our adventure is over! Tip: I dipped my brush in paint then water then blotted it a little to make the faint lines of grout and wood grain.  

You can call it done at this point or paint the remainder of the table that is showing. I think adding a real knob will really make this pop. You could also paint one in the center. The pictures do not really capture how cute this turned out. I cannot wait to place this in my little hill and put plants and a small fence around it. When I am finished all of you in Middle Earth are welcome to come see my own little Bag End in the Shire:)  

"The road goes ever on and on, down from the door where it began..." -Tolkien

Cindy W.
-Crafter, Mom, Travel Nut and Happy Hobbit